For a while now I’ve been using Parse for small apps, it allows you to iterate quickly and create a backend for an app without too much work. It also seems like a perfect jumping off point for a series of Android tutorials, where we’ll be building a “Todo List” application. (This tutorial assumes that you have Eclipse and the ADT installed already.)
The Setup
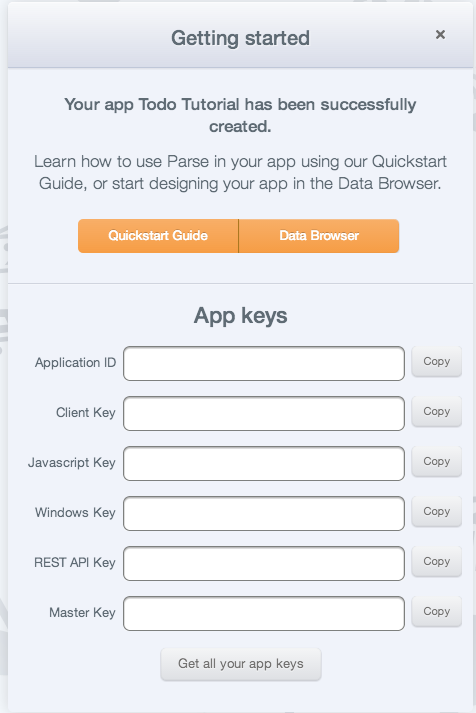
First thing you’ll want to do is sign up for Parse, and create a new Application. I called mine “Todo” here, but you can call it anything you’d like. After you pick a name, you’ll be presented a screen like the following, which contains your API keys. Do not lose these, this is how your app will connect to the Parse services. (I have removed my keys in the screenshot below.)

Next, you’ll want to download the Parse libraries from here.
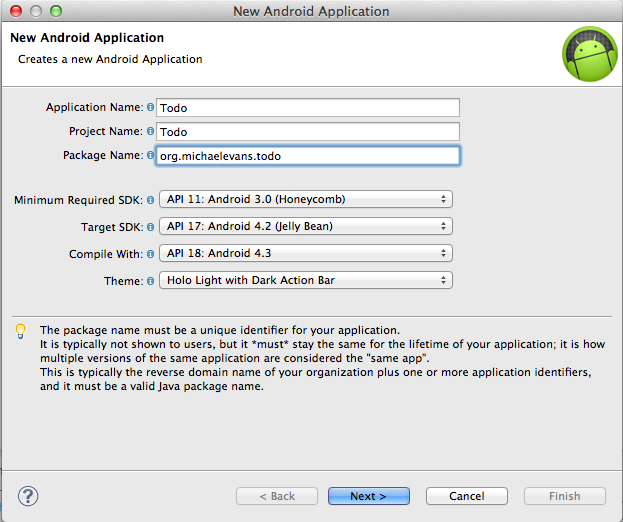
Back in Eclipse, open the New Project Wizard and create a new Android application. I set the minimum SDK version to Honeycomb in the screenshot below, but feel free to pick something newer if you’d like.

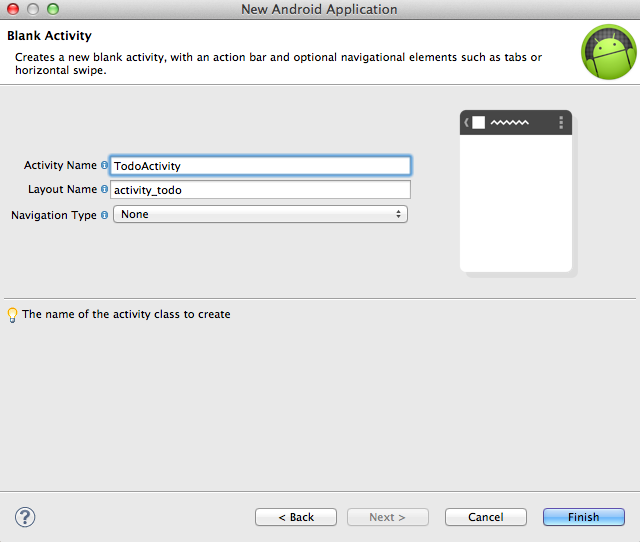
You’ll then be taken to a screen to create your starting activity. Choose Blank Activity, and feel free to name it whatever you like.

After you complete the wizard, you’ll have a new project in your workspace. Copy the Parse jar file that you downloaded before to the libs/ directory, and you’ll be all set to begin coding.
Let’s Code
Parse Setup
First thing we’ll add is the code to set up Parse. In the onCreate method of your Activity, add the following (remember to replace APP_ID and CLIENT_ID with the keys you got from Parse earlier):
1 2 | |
That second line is optional, but it adds analytics tracking to your app, which is a nice feature to get for free. In addition to that initializer code, we’ll need to add get some permissions for our app. Add the following two permissions to your AndroidManifest.xml file, above the <application> tag:
1 2 | |
Data Model
Now we’re able to interact with Parse using the included library. The next thing we’ll want to do is to declare a Task model. This object will represent an individual Task Object in Parse’s datastore. Create a new class named Task.java, and fill it out like the following:
1 2 3 4 5 6 7 8 9 10 11 12 13 14 15 16 17 18 19 20 21 22 23 24 25 | |
The annotation tells Parse what “table” that our object corresponds with, and then we are providing methods to get and set two properties: a description, and a completed status. In addition to those, Parse will give us created_at and updated_at fields for free.
Now that we’ve declared our model, we need to register this class with our activity. Below the initialization code, add a line like this:
1
| |
The Layout
This tells Parse to use the annotation that we declared at the top of the model. The next thing we want to do is set up the layout for our activity. This XML file will represent the UI of our application. Open up the todo_activity.xml file, and replace the contents with this:
1 2 3 4 5 6 7 8 9 10 11 12 13 14 15 16 17 18 19 20 21 22 23 24 25 26 27 28 29 30 31 32 33 34 35 36 37 38 39 | |
Here we are declaring a layout that contains an input field and a button (for creating new tasks), as well as a ListView for showing the existing tasks. If you run what we’ve done so far, you should end up with an application on your device that looks like this:

You can type in the input box, but if you hit the submit button, you’ll notice the app will crash. Why’s that? Because we said in our XML that the button will perform the createTask method when you click on it, but we never declared that method in our activity. Let’s do that now.
In your onCreate method, let’s get a reference to the EditText and ListView, since we’ll be using these later. You can do that by declaring using the findViewById() method. We’ll save the results of these calls as private variables. For example:
1 2 | |
Then we can create the createTask method:
1 2 3 4 5 6 7 8 9 | |
What we are doing here is checking to see if the input has anything in it (don’t want to create a task without a description), creating a new Task object, setting its fields, and then calling saveEventually(). This is a convenience method from Parse, that will queue this object to be saved. That way, if the user doesn’t have a network connection, the task will be uploaded later when they are back online. Finally, we empty out the input field so that it’s ready for another task.
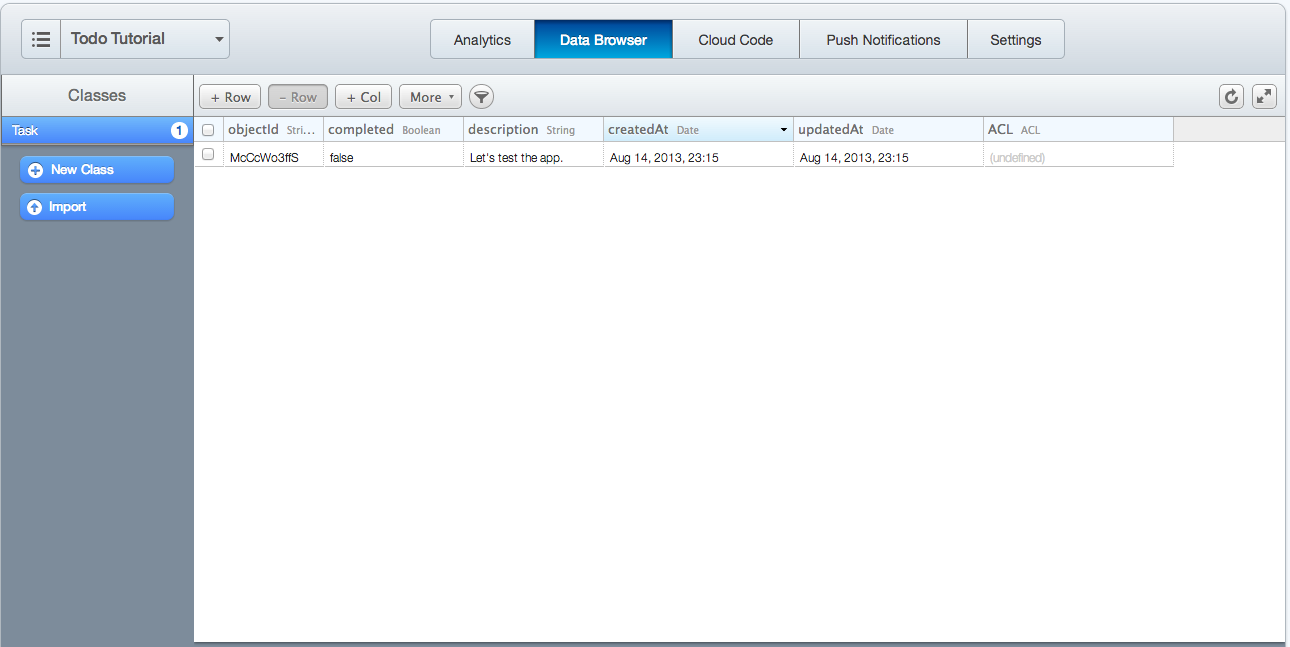
Now if you type in a task and hit save, the input field will be blank, but if you go to your Parse Console, you’ll see the data in the data browser:

Now let’s set up the app to fetch the Tasks from Parse.
Querying
First let’s set up a TaskAdapter. An adapter is what you add to a ListView to decide what kind of behavior the list will have (layout of each row, etc.) Create a new class called TaskAdapter that extends from ArrayAdapter like the following:
1 2 3 4 5 6 7 8 9 10 11 12 13 14 15 16 17 18 19 20 21 22 23 24 25 26 27 28 29 30 31 32 33 34 35 36 37 38 39 40 41 42 | |
This class will take an array of Tasks, and for each row in the ListView, set a TextView with the id task_description to the description value, and set a paint flag for Strikethrough if the task is completed. You’ll also notice that this class inflates a layout called task_row_item, which we can create now.
In the res/layouts/ folder, create a file called ‘task_row_item.xml’, and fill it with the following content:
1 2 3 4 5 6 7 8 9 10 11 12 13 14 15 16 17 | |
This is just a basic TextView which will hold the description of the item. Now that we have the adapter set up, let’s create one and apply it to our ListView. Back in the onCreate method of our Activity, create an instance of our TaskAdapter, and set its initial contents to a new ArrayList of Tasks, and then set the adapter of our ListView to this adapter.
1 2 | |
You’ll notice that nothing happens if you run the application again, since we didn’t yet fetch any data from Parse. Create a new method called updateData() and put in the following code: (be sure to make a call to this method at the end of onCreate())
1 2 3 4 5 6 7 8 9 10 11 12 13 | |
This will query Parse for all the Task objects, and return a list of them. Then we will clear the existing set of Tasks from our adapter, and replace the existing list with those. Now if you run the app, you’ll be greeted with something like the following:

Let’s also add this to our createTask() method, to insert the Task we just created at the top of the list:
1
| |
This will provide the user with an immediate hint of what happened, rather than uploading it, and waiting to resync the data or something.
Now we’re starting to have a functional app! Let’s add one more feature though. When you tap on a ListView row, the “completed” status of the task should toggle.
Let’s Toggle!
Let’s register an OnItemClickListener for our class, so that we’ll get a callback whenever a list item is clicked. We can do that with a call to
1
| |
Then we just make our Activity implement the OnItemClickListener interface, and override the onItemClick method. We can use some code like this:
1 2 3 4 5 6 7 8 9 10 11 12 13 14 15 | |
This will toggle the completion status of the clicked item, and then update the strikethrough, just as we did in the ArrayAdapter before. Then we’ll make another call to saveEventually(), to update that task on Parse’s servers, when a network connection is available.
That’s it! Now you should be able to launch the application, and create, complete and un-complete tasks as you wish!

Optimizations/Improvements
Let’s make some quick improvements to the app. First, let’s extract the hardcoded strings in our layout to a strings.xml file, so that we can support other languages. Change the text in the android:text= attributes to something like @string/submit_text, and create a strings.xml file in res/values where these strings will live. This allows you to create other values folders for quick localization.
The other optimization that we’ll make is regarding the caching. You’ll notice that if you leave the application and come back, you’re left with a blank white screen while the Tasks are loaded from Parse. This is a bit ugly, and leaves a bad user experience. We can mitigate that by adding caching, where the results of our query will be saved locally so that we have results instantly, and then we can request the updated tasks from the network. With Parse, this is dead simple. Add the following snippet to your query object before you do a findInBackground:
1
| |
Now when you load up the app, you’ll see the tasks from last time in the list, while the network is being queried.
Possibilities for Next Time
Next time we can take a look at adding multi-user support (so that not everyone shares a task list), and possibly some fancier UI, like a swipe-to-remove feature. Feel free to make other suggestions of things you’d like to see!
You can download the APK for this tutorial here, and find the source on Github here.
Like this post? Questions, concerns or mistakes? Any other Android tutorials you’d like to hear about? Let me know on Twitter or Google Plus, or leave a comment below.